Technology / Software
Organize Client Projects Easily Using CapCut Desktop Video Editor
20 May 2025 at 17:55hrs |
8 Views

Client projects can be hard to handle, especially when creating videos based on their specifications. Having a proper video editing tool can go a long way in staying organized and delivering quality results.
With the right tool, you can easily organize media, edit, and share videos with your clients. CapCut Desktop Video Editor is a great tool for this purpose.
It allows you to manage multiple projects while giving you the functionality needed to professionally and efficiently edit videos. Let’s look at how this software can simplify the management of your client video projects.
CapCut Desktop Video Editor keeps client projects in line
CapCut Desktop Video Editor helps you keep client projects in order with its ease of use. The timeline function enables you to arrange clips, audio, and images in a neat way, which is good for keeping you focused.
You can also export and import files immediately, which is time-saving in your workflow. If you work on several projects, CapCut PC keeps everything in one place so that you can access them at your convenience.
And, you can add text to speech for enhanced accessibility and more interesting content. CapCut’s streamlined interface helps you create polished, professional videos with ease.
That is why it is a great choice for managing client projects and creating videos to their liking.
CapCut Desktop Features for Project Management
Project Management Features:
CapCut Desktop Video Editor streamlines media files by allowing you to create folders and use labels. It helps keep things in order and readily accessible.
Its timeline and track options allow you to arrange different project elements, making editing and arranging video clips, images, and audio files a breeze.
Editing and Collaboration Tools:
CapCut PC offers seamless editing and collaboration capabilities. Cloud syncing makes sure your projects are synced up across devices.
Sharing files with team members or clients is a breeze, and real-time collaboration features make editing together a piece of cake. The AI video generator also helps you to easily and quickly create engaging content.
CapCut for Workflow Efficiency
CapCut increases productivity in workflow by simplifying tasks like auto-correction and the application of effects. The voice changer feature makes it easy to edit audio.
All these time-saving capabilities help you to simplify the editing process so that you can focus on the creative process of your project while CapCut handles the repetitive editing work.
Why Choose CapCut Desktop Video Editor for Client Projects
CapCut Desktop Video Editor is among the best tools for handling client projects because it has a simple and easy-to-use interface.
Both a new user and an experienced user will find it easy to learn and use. It has a simple layout and all the features are readily accessible, so editing is quick and easy.
CapCut is multifunctional, hence you can use it for various kinds of video projects from promos to presentations.
You can utilize it to edit shorts or full-length videos and it supports a vast range of video formats. Being so adaptive, you can utilize it to create content that you would want your client to obtain.
Even though CapCut offers a wide range of features for free, some of the high-end features are charged on a paid plan. For example, more export settings, further transitions, and special effects only work on a paid plan.
Nevertheless, there are enough features in the free version to schedule and edit clients' projects. Regardless of the size of the projects, CapCut Desktop Video Editor has everything you require to create top-class results.
Steps to Plan Client Projects with CapCut Desktop Video Editor
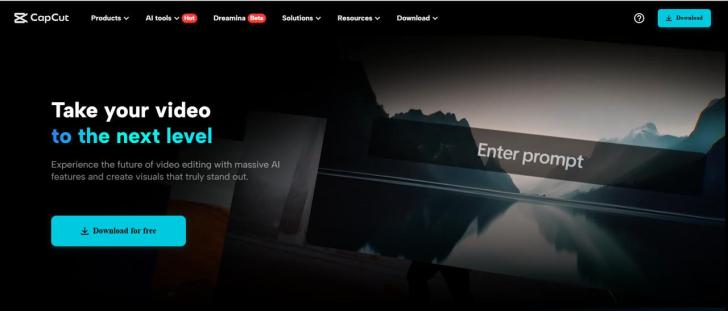
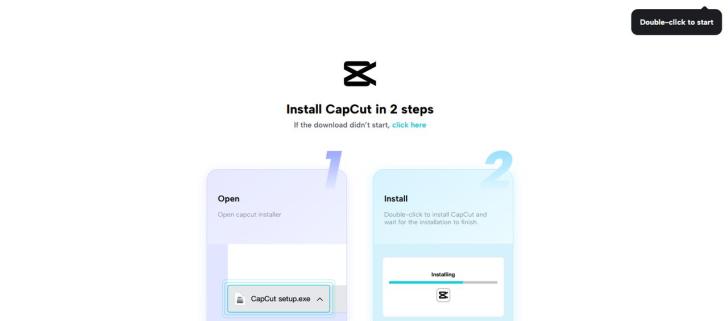
Step 1: Download CapCut Desktop Video Editor
Start by visiting the official CapCut website on your computer and locating the download section. Click the download button to get the installer, then open the file to begin installation.
Follow the on-screen prompts to complete the setup of the CapCut Desktop Video Editor. Download it only from the original website to avoid security issues or malware.
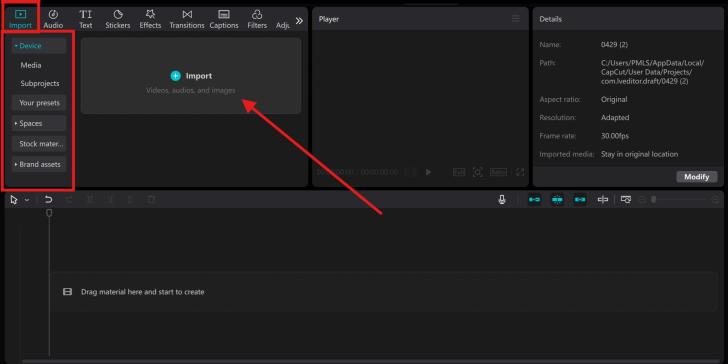
Step 2: Create a New Project
After installation is complete, launch CapCut Desktop Video Editor. To begin a new project, click the "New Project" button.
You will then be required to set your project settings, such as resolution and frame rate. Select the best possible settings to match the quality and format of the video you want to create.
Then, hit on "Import" to import your client's media files, i.e., video, images, and audio. CapCut gives you an easy means of sorting out these files by dragging them onto the timeline or placing them into folders for easy retrieval.
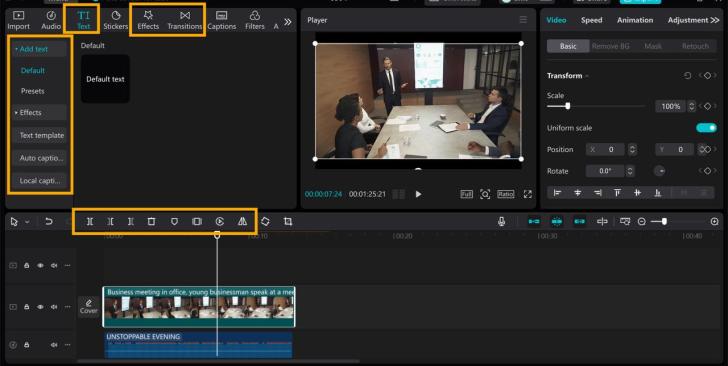
Step 3: Edit Your Project Elements
Start editing by dragging your media files onto the timeline. Trim, split, or move clips to alter the flow. Use CapCut's editing options to adjust color, contrast, and brightness.
Insert text as well by selecting the "Text" option, picking a style, and typing your message.
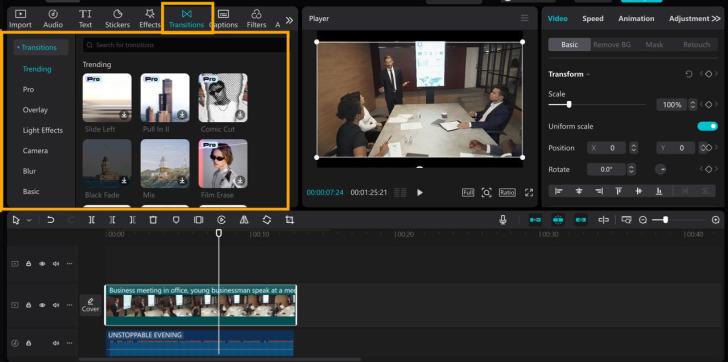
Step 4: Put Your Media in Order and Add Transitions
To add transitions, go to the "Transitions" tab, then simply drag and drop your chosen transition between the clips on your timeline. This gives your video a smooth, professional flow.
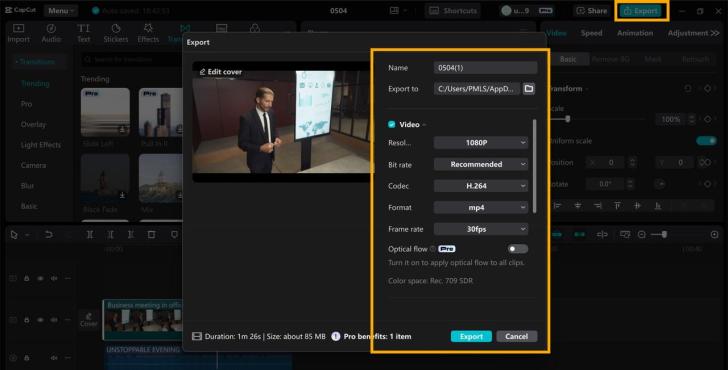
Step 5: Export and Share
Once you've finished your project, you're ready to export the final video. Click on "Export" and choose your preferred file format and resolution.
After selecting your desired export settings, click "Export" to save the video to your computer. To keep yourself organized, make folders for various media types, like "Video Clips," "Audio," and "Images." This makes it easy to locate files.
Conclusion
With the CapCut Desktop Video Editor, keeping your client projects organized and easy to manage is simple. It assists you in working faster and producing clear, professional-looking videos.
Its simplified tools keep your projects organized and simple to work with. If you desire even more functionalities, then use the premium features. Begin working on your next client project with CapCut desktop video editor and experience the difference.
With the right tool, you can easily organize media, edit, and share videos with your clients. CapCut Desktop Video Editor is a great tool for this purpose.
It allows you to manage multiple projects while giving you the functionality needed to professionally and efficiently edit videos. Let’s look at how this software can simplify the management of your client video projects.
CapCut Desktop Video Editor keeps client projects in line
CapCut Desktop Video Editor helps you keep client projects in order with its ease of use. The timeline function enables you to arrange clips, audio, and images in a neat way, which is good for keeping you focused.
You can also export and import files immediately, which is time-saving in your workflow. If you work on several projects, CapCut PC keeps everything in one place so that you can access them at your convenience.
And, you can add text to speech for enhanced accessibility and more interesting content. CapCut’s streamlined interface helps you create polished, professional videos with ease.
That is why it is a great choice for managing client projects and creating videos to their liking.
CapCut Desktop Features for Project Management
Project Management Features:
CapCut Desktop Video Editor streamlines media files by allowing you to create folders and use labels. It helps keep things in order and readily accessible.
Its timeline and track options allow you to arrange different project elements, making editing and arranging video clips, images, and audio files a breeze.
Editing and Collaboration Tools:
CapCut PC offers seamless editing and collaboration capabilities. Cloud syncing makes sure your projects are synced up across devices.
Sharing files with team members or clients is a breeze, and real-time collaboration features make editing together a piece of cake. The AI video generator also helps you to easily and quickly create engaging content.
CapCut for Workflow Efficiency
CapCut increases productivity in workflow by simplifying tasks like auto-correction and the application of effects. The voice changer feature makes it easy to edit audio.
All these time-saving capabilities help you to simplify the editing process so that you can focus on the creative process of your project while CapCut handles the repetitive editing work.
Why Choose CapCut Desktop Video Editor for Client Projects
CapCut Desktop Video Editor is among the best tools for handling client projects because it has a simple and easy-to-use interface.
Both a new user and an experienced user will find it easy to learn and use. It has a simple layout and all the features are readily accessible, so editing is quick and easy.
CapCut is multifunctional, hence you can use it for various kinds of video projects from promos to presentations.
You can utilize it to edit shorts or full-length videos and it supports a vast range of video formats. Being so adaptive, you can utilize it to create content that you would want your client to obtain.
Even though CapCut offers a wide range of features for free, some of the high-end features are charged on a paid plan. For example, more export settings, further transitions, and special effects only work on a paid plan.
Steps to Plan Client Projects with CapCut Desktop Video Editor
Step 1: Download CapCut Desktop Video Editor
Start by visiting the official CapCut website on your computer and locating the download section. Click the download button to get the installer, then open the file to begin installation.
Follow the on-screen prompts to complete the setup of the CapCut Desktop Video Editor. Download it only from the original website to avoid security issues or malware.
Step 2: Create a New Project
After installation is complete, launch CapCut Desktop Video Editor. To begin a new project, click the "New Project" button.
You will then be required to set your project settings, such as resolution and frame rate. Select the best possible settings to match the quality and format of the video you want to create.
Then, hit on "Import" to import your client's media files, i.e., video, images, and audio. CapCut gives you an easy means of sorting out these files by dragging them onto the timeline or placing them into folders for easy retrieval.
Step 3: Edit Your Project Elements
Start editing by dragging your media files onto the timeline. Trim, split, or move clips to alter the flow. Use CapCut's editing options to adjust color, contrast, and brightness.
Insert text as well by selecting the "Text" option, picking a style, and typing your message.
Step 4: Put Your Media in Order and Add Transitions
To add transitions, go to the "Transitions" tab, then simply drag and drop your chosen transition between the clips on your timeline. This gives your video a smooth, professional flow.
Step 5: Export and Share
Once you've finished your project, you're ready to export the final video. Click on "Export" and choose your preferred file format and resolution.
After selecting your desired export settings, click "Export" to save the video to your computer. To keep yourself organized, make folders for various media types, like "Video Clips," "Audio," and "Images." This makes it easy to locate files.
Conclusion
With the CapCut Desktop Video Editor, keeping your client projects organized and easy to manage is simple. It assists you in working faster and producing clear, professional-looking videos.
Its simplified tools keep your projects organized and simple to work with. If you desire even more functionalities, then use the premium features. Begin working on your next client project with CapCut desktop video editor and experience the difference.
Source - Byo24News
Join the discussion
Loading comments…